I love drawing.
I love doing creative things.
And I love seeing the finished image going out to live its own life.
The thing is that I lack the discipline to create on a daily basis.
I slack. And I procrastinate.
So here I am. Making a commitment to myself.
And no, it's not another New Year resolution.
It's a goal.
A goal to develop my drawing skills during the next year and the years after.
This blog will be some kind of self report of this development. It will be the place for me to share my progress with everybody else. It will become my second art school.
This blog will also be a collection of useful exercises to practice basic art of sketching and doodling. Beside those I will publish my own drawing tutorials which will some kind be conclusions of my studies.
I hope I will keep this goal and make it happen.
Good luck to me and you.
Let the doodling begin!
January 31, 2010

August 28, 2009
Making a Refrigerator with Max
Hi all!
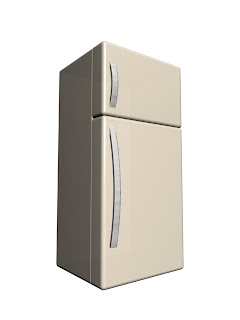
In this tutorial you will learn how to create a simple refrigerator using mainly Chamfer boxes.
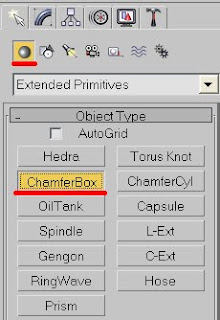
1. Create a Chamfer box on a top view....
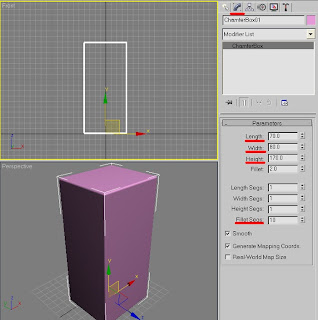
..and in a Modify panel change its parameters to 70, 80, 170; Fillet-2 and Fillet Segments-10 or just measure your own fridge and work from that.
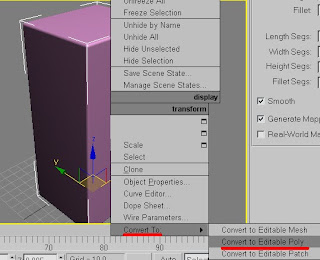
2. Right click the box and convert it to Editable poly.
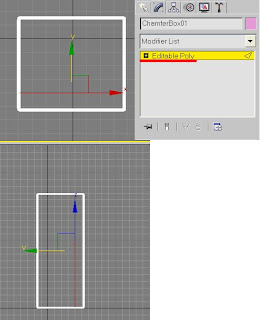
3. Go to a Modify panel and choose Edge sub-object. Connect Top edges as shown on the image and move them right a bit.
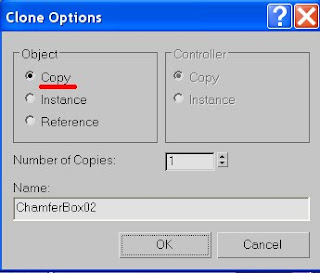
4. Release Modify and Copy (Shift + Drag) the box.
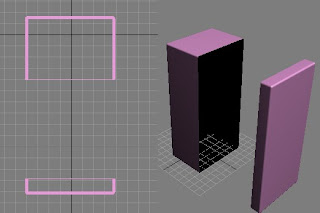
5. In both boxes delete vertexes so you have a main body part and a door part.
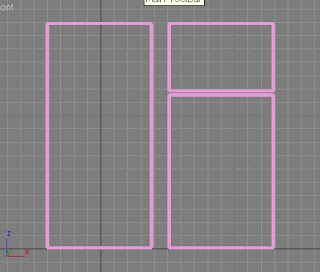
6. Choose the door part and duplicate it. By moving vertexes up create a Freezer door and by down – main body door.
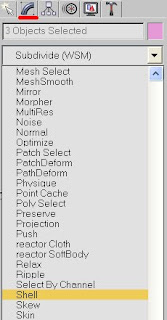
7. If you hit Render (F9) u will probably notice that some, or even most of the parts are missing. This is why we deleted some of the vertexes before. To fix that choose all parts (Ctrl+A) and choose Shell modifier in a Modify panel.
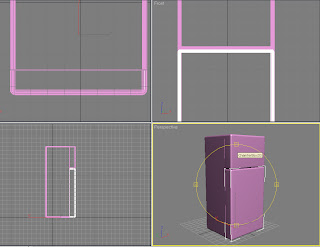
8. Arrange all the parts so it looks like fridge and hit Render (F9).
Now we'll add some details.
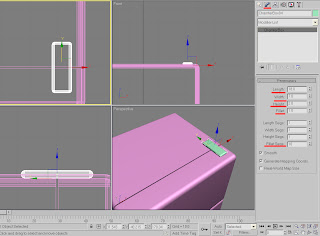
9. There is a part on the top of the fridge that connects the freezer door to the main body. To make one create another Chamfer box on a top view measured 18, 5, 2; Fillet 1 and Fillet Segments 10and place it on the top of the fridge.
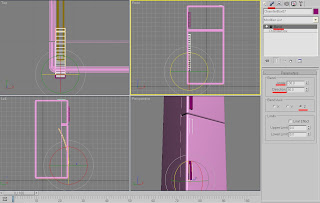
10. Also, as you've probably noticed before, every fridge usually has some kind of legs that that it stands on, so you can either put some Boxes under it or Extrude them from the main body.
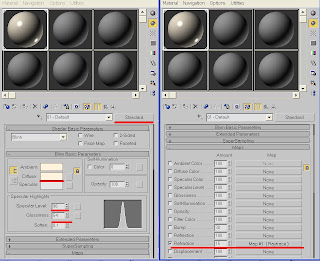
Time to create some Materials – so press M on your keyboard.
11. For the Fridge I used an Off-white color with a Standard material, Specular Level of 96 and Glossiness – 54. Scroll down to Maps and set Refraction to 15 and a Raytrace material (leave as is).
12. The handle is some kind of a glossy metallic surface, so I used Standard material and a Multy-layer shader.
13. For first specular level set Color to 229, 229, 229 (light grey), Level to 537, Glossiness 19, Anisotropy 78.
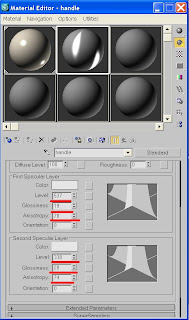
14. For second specular level set Color to 229, 229, 229 (light grey), Level to 338, Glossiness 28, Anisotropy 74.
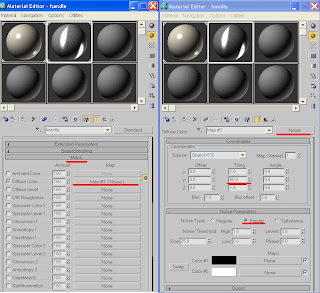
16. Scroll down to Maps and set a Diffuse color to Noise. Change Tiling Y to 50; Fractal.
17. Set Color 1 to Raytrace and leave the rest as is.
Apply materials to your refrigerator.
18. Hit 8 to change your background color to White and then hit render (F9).
The fridge is ready.
If you have any questions regarding this tutorial - don’t hesitate to ask me.

In this tutorial you will learn how to create a simple refrigerator using mainly Chamfer boxes.

1. Create a Chamfer box on a top view....

..and in a Modify panel change its parameters to 70, 80, 170; Fillet-2 and Fillet Segments-10 or just measure your own fridge and work from that.

2. Right click the box and convert it to Editable poly.

3. Go to a Modify panel and choose Edge sub-object. Connect Top edges as shown on the image and move them right a bit.

4. Release Modify and Copy (Shift + Drag) the box.

5. In both boxes delete vertexes so you have a main body part and a door part.

6. Choose the door part and duplicate it. By moving vertexes up create a Freezer door and by down – main body door.

7. If you hit Render (F9) u will probably notice that some, or even most of the parts are missing. This is why we deleted some of the vertexes before. To fix that choose all parts (Ctrl+A) and choose Shell modifier in a Modify panel.

8. Arrange all the parts so it looks like fridge and hit Render (F9).
Now we'll add some details.

9. There is a part on the top of the fridge that connects the freezer door to the main body. To make one create another Chamfer box on a top view measured 18, 5, 2; Fillet 1 and Fillet Segments 10and place it on the top of the fridge.

10. Also, as you've probably noticed before, every fridge usually has some kind of legs that that it stands on, so you can either put some Boxes under it or Extrude them from the main body.

Time to create some Materials – so press M on your keyboard.
11. For the Fridge I used an Off-white color with a Standard material, Specular Level of 96 and Glossiness – 54. Scroll down to Maps and set Refraction to 15 and a Raytrace material (leave as is).
12. The handle is some kind of a glossy metallic surface, so I used Standard material and a Multy-layer shader.
13. For first specular level set Color to 229, 229, 229 (light grey), Level to 537, Glossiness 19, Anisotropy 78.

14. For second specular level set Color to 229, 229, 229 (light grey), Level to 338, Glossiness 28, Anisotropy 74.

16. Scroll down to Maps and set a Diffuse color to Noise. Change Tiling Y to 50; Fractal.
17. Set Color 1 to Raytrace and leave the rest as is.
Apply materials to your refrigerator.
18. Hit 8 to change your background color to White and then hit render (F9).
The fridge is ready.
If you have any questions regarding this tutorial - don’t hesitate to ask me.
Subscribe to:
Posts (Atom)