December 28, 2011

2011: The conclusion


2011 is coming to its end and its time to look back at what was done this year.
Well, actually it is the conclusion of the last four months of activity since it was only in September that I was able to let go of everything that kept me busy from becoming an illustrator that I want to be.
Since then - it became a full speed ride.

This September I set up some goals for the end of the year and here's the result:
The do's:
1. I finished my Graphic Design course which I started in March.
2. I promised to draw at least 10 sketches per day – and I’m proud to say: Check!
3. I decided to blog every single week with reports of my progress - Done! Sometimes I even blog twice a week.
4. I've enlarged my Zazzle Graphiking giftshop from 800 items to almost 2000.
5. I promised to myself to add 20 illustrations to my ShutterStock gallery - And I did!!! 21, to be exact, and that's the one I'm really proud of!!!
6. I managed to enlarge my Adsense income - it's still a cent here and a cent there, but it's an EVERYDAY cent! Which is better than nothing!!
7. I am able to create a greeting card in an hour now - and this is a real achievement!
8. I work with my Keywords ALL THE TIME, I love this system and I really advise you to try it. It’s really helpful.

The Don'ts:
1. I don't do the 5, 10, 15 minute exercise and I should, at least once a week.
2. I abandoned my SEO education, so I must start reading more.
3. I didn't manage to enlarge my blog traffic but I did manage to stabilize, and I don't intend to stop there.

From the look on it, it seems that I did more than I didn't. Good for me!

New Year’s plan is on its way.

Have a great year!!!

December 25, 2011

Daynix Hanukkah card


A few days ago I've designed this Hanukkah card for  Daynix Computing Ltd.

Daynix is a software company I've been working with for some time now doing some general branding for them, including some occasional illustration like invitations and greeting cards.

Beside the fact that I really like this card I must admit that it's some kind of mile stone for me. This card is my fastest work ever; it was created in only 1 hour. I guess that I've been working really intensively lately if I was able to create something that quickly. Like my mom said: "You're gaining some experience".

I hope youre enjoining this holiday season.
I know I do.

December 21, 2011

Happy Hanukkah!!!


It is December 21st here in Israel and Hanukkah holidays have just began. The Sufganuyot and Hanukkah candles are being sold in shops for many days now, and the first candle was lit last night.

I wish you all a great and tasty Hanukkah, have fun with your kids and watch your diet.

Till the next time!

December 19, 2011

Hannuka items


As you well know, Hanukkah is not just about dreidel and lights, it’s about yummy food and giving presents. All kids expect some cash from their grand parents and for some yummy latkes and donuts. It’s about celebration miracles and joys.

From the illustrators point of view there are lots and lots of items to refer to and combine one with another.
And since it's impossible to ignore the fact that Hanukkah is so close to Christmas and New year celebrations, it would be too arrogant - i think - to separate the two and not to create some combination, at least via illustrations.

So there are mittens with dreidels, and money with candles, and donuts on snow.


Here are some of my sketches on these themes.


Have a great holiday season!!!

P.S. The higher resolution of the image above can be found in my ShutterStock gallery.

December 15, 2011

Candle sticks and holidays: Hanukkah menora.

Two of the most used objects of almost any indoors event are candles and candle stick. We use them everywhere, either it's a holiday like New Years Eve, birthday or Hanukkah or a special event like a birthday or a marriage proposal.
In this post I will deal with Hanukkiah, a nine-branched candelabrum lit during the eight-day of Hanukkah. One candle for each day of the holiday, while the ninth one - Shamash - is used to lit the other candles.

When creating/using a Hannukiya you should that it should be Kosher, which means all candles should be leveled to one straight line. Shamash is the only candle that sticks out; it should stand a bit higher than the others.

Although when you design, I guess there are no limits to it.

Here are some of my sketches.


Have a great and tasty holiday.

December 09, 2011

Sketching New Year frames

Just for the fun of it I've been playing with idea of creating some colorful Christmas frames. It was the first time in years that I've used colorful pencils and it was actually much easier to work with color when you know exactly what it’s going to be. But I guess it's just easy with New Year's colors: Green, red and white are the basics and the rest is just your imagination.

So here are some of my frames. These are not fancy sketches but you know, with the right software and other additions it can look simply gorgeous.

Have a great Holiday season!

P.S. Fineshed and high-res illustrations can be found in my ShutterStock galery or in my Graphiking Giftshop.

December 06, 2011

Festive Hanukkah Illustration


What I really like about working with keywords is that its simply generates brainstorming. So what happens is just some of the sketches just "happen". I mean, I know its not something that "just happens", but I guess it's not something that I personally would "just" think about! Ive been working lately on Hanukkah illustrations and used some traditional Jewish symbolics for that matter, combining with all the celebrations around.

This image is one of these "accsidental" illustartions that "happened" a few days ago, and I can honestly say that I'm pretty happy with it.

December 02, 2011

New Year candle with a scarf


It Is really cold outside now so there's no better time to start working on some winter illustrations.

A few days ago I took my New Year keyword plastic bag and pulled some notes out of it.
I got Candle and Earmuffs.
And immideately this punk was created.


I thought it was too agressive for New year illustration and drew anther one. I looked at it and realised that there was something missing. So I added a pair of mittens beside it.


And then I thought again and realised that if I have a candle with a pair of mittens, why not create a candle with a scarf? So this sketch was made.

Naturally - at least in this case- I've decided to create a whole series of candles with differentely tied scarfs. For a reference I used this cool 25 ways to wear a scarf video, so thanks, Wendy :)

It was a very fun exercise wich gave me a whole lot of ideas for illustration, I mean we do wear lots of different clothes during the year, so why not use it?

You can see this illustration in use in my Zazzle store and my ShutterStock gallery .

I hope you enjoyed this post.
Have a great holiday season,
D.

November 28, 2011

Candle sticks and holidays: Everyday candle stick

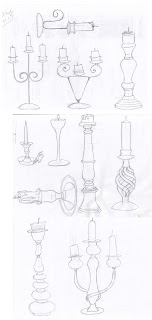
It's a holiday season and one of the Holiday's attributes is a Candle with its stick. So today I will sketch a simple candlestick and its candle.
The thing I love the most about the usage of candles is that if you don't have a fancy candle stick you can use it with almost any object: you can put it in a glass, a coaster; a vase filled with water and flowers or just wrap it with an aluminium foil. You can decorate a wreath with it or a tree, put it on a table and a border of your bath - no rules there, actually.
I googgled "candle stick" and drew my way through the pages. Although most of them were classical ones but they all were different. So first I'd like to thank all those who created these images; you all supply a great learning material for those like me who are willing to learn indoors.

One of the things I've learned is that when drawing a candlestick you should always create a center line and mark the different levels/parts of it; it will make your life much easier. Remember to always start with light lines; you will create a thick outline when you're done.

So here are my sketches: I worked with simple geometrical candles, some of them were deformed and half burned.
One thing I did learn this time: There is never enough sheet for a candle itself :)
Hope you found this post useful.
Have a great holiday season.

Yours truly,
D.

November 24, 2011

Drawing a donut

Hanukkah, a cool and tasty holiday is near and since one of it's treats are donuts then it's time to learn a bit about of these oily greesy things.
It's obvious that different cultures have different name for the same thing:
There is an American donut, a Russian ponchink, an Israeli sufgania  and  a Morrocan sfinj - and these the four that I personally tasted and I'm sure there are more :).
They all mean the same: A piece of dough fried in deep oil, and after that filled with either jam or glased with colorful glasings, sometimes dipped in deluted honey or sugar.

Since Hannuka is coming in December I've been sketching lots and lots of these yammi and very fattening food. While watching closely I've come to realise that there is a very distinguished difference in its forms: Donut and sufgania make almost a perfect smooth edge while sfinj and ponchick have a pretty curvy shape.


So when trying to draw the first two try to make your lines pretty streight, almost perfect. When drawing the second two - do a soft curvy line to make it look natural.


Have a great and sweet day,
D.

November 20, 2011

Drawing clay jugs


Today is a Clay Jug day. I am learning to draw pottery items. I am looking for different perspectives trying to capture the basic form. I have no idea what it's going to be good for, but I guess it's a result of a brainstorming flow, getting ready for Hanukkah illustrations.


As usual – there are no shadows, no details. It's just a basic form.
While sketching I've realised that you don't really have to try hard to draw an item on its side - and I'm talking ONLY about the X&Y scale here - but you can draw it just as is and then rotate it right and left, as required for the specific project. No difference really. Or I might be wrong.

Of course it is better to make the effort and draw it again in the originally required position, but hey, one can do it a bit later.


These quick sketches are just a few hours of work. Each took between 10 to 15 minutes . The process is the most important. Of course, when there are some complete illustrations I will show them off.


Have a great and productive day.

Yours truly,
D.

November 15, 2011

Next stop: winter holidays!!!

Hello there!!!

Halloween is over and this means that we move on to the next three holidays: Hanukah, Christmas and New years. All celebrated in the end of the year, in a winter time.

Since the three of them are celebrated one so close to another I will have to work really intensively - and I hate the word "hard" - to create as many illustrations as possible. I guess it will be some kind of challenge for me this time. I would like to create at least 20 illustrations by the end of the year. It might seem a little, but not for me. Snowmen, snowflakes, donuts, presents, money bags, Christmas trees, Santas and dragons will be in place.
The idea, as usual, is to sketch a lot and then to create something original.

So the keyword notes are ready, the paper sheets are out and pencils are sharpened.
Ready! Set! Go!

Have a great holiday season!

Halloween illustrations

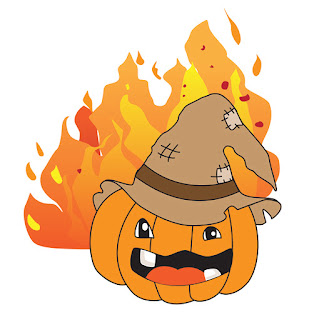
And now, as promised, although with a small delay, here are the two illustration that were created for this Halloween: Jack with Hat and Fire and another with Tree and Moon.


You can see the creation prosess in Jack o'Lantern: creating from skratch post.
Also a high quality images are avaliable for sale in my Shutterstock gallery and in the Graphiking gift shop.

I hope you had a great holiday this year!!!
See you soon :)

November 07, 2011

Creating geometrical patterns

I’ve been dealing a lot with patterns lately, and I started to look for some info online about creating them.
Basically, pattern is a repetition of the same thing.
So the first thing you should remember while working on a pattern is to create this basic “thing” or element that will repeat itself over and over again.
The big question is how exactly do we create these basic elements?

So the basic idea is when creating a geometric pattern is to take several basic figures and arrange them beautifully together.
You don't have to know what it's going to look like. All you should do is to start playing with these figures. Connect and disconnect them. Just like playing a Lego. Sketch. Move. Remove. Rotate the paper you're sketching on.

That sketch was the base to my illustration.
After having some decent base I started working in Illustrator.
I don't know exactly how long it took me to create the final result, but there it is:


A single element and a pattern.


I like it and I hope I was helpful.
Good luck in creating those gorgeous patterns.

October 29, 2011

Jack o'Lantern: creating from skratch

Do you know these "advisers" who just love advising but never follow their own advice? I bet you do. And did it ever happen to you that you said "I would/could/should do this and that" but never actually did? I bet it did!!!

And I will lie to you if I say that I am any different!!!

But this Halloween I've decided to change some things and follow my own advice.

In one of my previous posts I've written about Character development and since it's a Halloween season I decided to create some Halloween illustration (although it’s a bit late for that).
I've written down some keywords - my associations with Halloween - on little notes, folded them and tuck them in a small plastic bag. And then I started pulling some of them out.
The problem was that all the notes I pulled out were too abstract for my inexperienced taste: there were things like “rough” and “speed” and something else, things like that. So I've decided that since it was the first time I did something like that I was allowed to cheat a bit. I looked at my list and chose three words: "pumpkin", "hat" and "fire" and combined it all together.

Pretty easy, I'd say.


So after some work this sketch was made


followed by this unfinished illustration.


I promise that as soon as it's finished - I will show it to you.

In the meantime – have a great Halloween!!!!

October 26, 2011

The power of Kewords: Developing a character piece by piece

I must admit - I don't remember whether I've read about it or have I thought about it myself. Either way there is another, really cool method of developing a character/theme.

You take an empty paper sheet, divide it in to small pieces and on each piece you write a keyword related to the specific theme you are working on.

Say you're working on a Halloween illustration, and you need to develop an image. So you write every single word associated with Halloween: Jack’o'lantern, ghoul, bat, Frankenstein etc. You mix all these pieces of paper and then you randomly choose two or three pieces, like Jack’o'Lantern + Frankenstein + bat.
And you work from there.

Have you ever tried this method and had it work for you?

Happy Halloween and lots of candies :)

October 24, 2011

How to draw Pumpkin leaves

Since Halloween is near I set myself on drawing pumpkins as my daily sketching routine. Well, pumpkins I can draw, what I needed this time is to draw its leaves and flowers and then make an illustration of it.
To do so I used many many online references using both web and stock snapshots and illustrations.
There are several goals in these sketches actually: besides doing it well, I wish to sketch faster and lighter, but I guess, these only come with experience. So: patience.... I guess I'll have to develop this one too...
So these are the sketches and I hope soon the illustrations will come. Like I've already mentioned in previous ports, for now it’s all about the simple outline sketch, not a full drawing.

After a few days of sketching I think I figured out the structure of this leaf: Its a big trapeze connected with a small triangle. And sometimes, if the leaf is really big - it's 2 trapezes and a triangle. But as I was sketching I've noticed that this formula works only for the spread flattened leaf. When it’s rotated, or flipped or viewed from any other perspective, it is another structure. And I guess it will be unique to each leaf.

And yes, I have noticed that there were some grape leaves on the way :)

Have a great day :)

October 22, 2011

Exploring the form - graduation Hat and Scroll

One of my drawing goals is to learn how to trace a form, even the simplest one, how to capture a basic line of an object. No shadows, no sub-lines - just a contour.

To do that I usually search for a desired object online or around me. If it is an online image, I usually look for several of them to explore how they look from different angles. If its something that is in the house, well, I just turn it around or turn around it.

One of the latest images I've been working with is a graduation Hat and Scroll. The idea came from Zazzle, where I and other sellers where reminded that its a graduation period and its time to preapare some graduation products. So my goal was to find an easy way to draw it. I wanted to draw as many as possible without making it beautiful but by making it simple and quick.

This is the result.


So to draw a Graduation Hat you need to

October 18, 2011

Setting and achieving goals: what have been done?

I've started this blog almost two years ago with a personal resolution to improve my drawing skills and to develop myself as an illustrator.
I said that this blog would be a  "self report of this development" .

In my other post I've committed to do at least 10 sketches per day .

Well, I've succeeded in some of my commitments:
I draw every day. I have know idea if I'm getting any better, but I draw.
And each time I do way more then 10 sketches at a time.
I develop my portfolio. I am slowly enlarging my stock gallery .

Bu I do not report my progress, and I should.
I do not look for other learning methods - and I should.
I do not do the 5,10,15 p/m sketch, which is bad.

I commit here once again to do these on a regular basis and report about it in this blog.

Wish me luck.

October 16, 2011

Copying art to master a subject

We all know that in order to learn and to develope skill one must copy others work/creations.
It doesn't really matter who do you copy from - it can be drawing from nature, from an art piece or a sculpture and it also can be from anothers render or illustration.

I've always had this will to be original and to develop my own thing. But on the way to originality I forgot that there's still some technique to be leart and style to be found. And that takes time and practice.
So today I've finally decided to let go of the "copying" guilt and start copying from others in order to learn. I realised that I've had it with online tutorials - and I must start analysing to become a better artist/illustrator.
So from now on I will try to display boths sketches and illustrations as a part ofmy training.

What do you think? Do you do that too?

Have a joyfull day!

September 20, 2011

Freehand drawing in Illustrator (or any other vector software)

As far as I can remember myself I always tended to perfection. I just needed to do a perfect work. A perfect sculpture. A perfect drawing. A perfect render. To achieve that every single project of mine - even the tiniest - required preparation and time of making. Usually too much time. And I would get stuck alot if I saw that my project didn't reach my original vision. I would never drop the project but I could work on it for ages.
It would usually start with lots and lots of paper drawing, then creating my new original form and then followed by endless redrawing, scanning, placing, outlining, printing, scanning and outlining again and again and it would go on and on for ages!!!
Well recently I was suggested to try a new method of free drawing. No scanning and outlining, just - maybe - a sketch and drawing just from watching.

Well, let me tell you guys, it's a lot like 5, 10, 15 minutes drawing  exercise. It is far from being perfect, bud hey, it works great for me!!! I love it!!! These are the latest results - each object took from 5 minutes sketch and 10 to 30 minutes to create in Illustrator.
If this method is new to you, don't hesitate and try it, it’s a real fun.

Enjoy!!!

August 17, 2011

Hand drawing tutorial

When I learn to draw something new, I usually look for the simpliest way to do it - first to learn and get the general form of an object just to make it more complicated and sofisticated in the future.

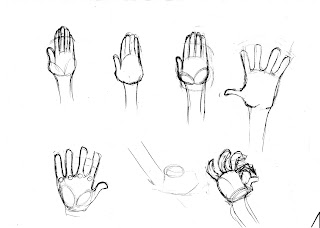
This time my task is to learn how to draw human hands.

Of course, there are wonderfull book by Burne Hogarth , but I really wanted to start with something really really basic.

So I found this tutorial created by alexds1 from DevianArt.


These are my first tryouts of this great tut. Not perfect, but good for a first tryout.


I hope you will find it as useful as I have.