![](https://blogger.googleusercontent.com/img/b/R29vZ2xl/AVvXsEjM3KYL60LoJsh9xVe_k6dLysWzQk3_S51vnB9g7d_rXVtbfO4WM2nSiW1euL_xhMBpDwcEM8F5-9QARn0KoJHUosLqshjoYu0K_3TxxtHSM6O3CxRjWx-doUk2MMKxDYEDF4pgqLt9ILDP/s320/creating+a+card+-+1+small.jpg)
In Part 2 we will be creating a Valentine card itself using the Heart image we created in Part 1 .
![](https://blogger.googleusercontent.com/img/b/R29vZ2xl/AVvXsEifLoPinS0TBvt82PF91nH3eAXJjItNCczEXBdT38gMAD4LyTaiQTMblL-ZRdb9yKi45CAURpZWHr8zXx4i-1zBdZ3cDuH3e8HBbF6N3dZ0yXuXR9Mwagc1qkUM3EVgdwE3cWvMw_JGu5UH/s320/1+-+heart+A-Group+copy.jpg)
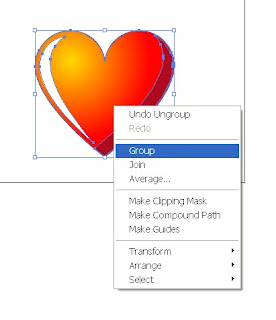
1. Place the heart you created in Part 1 of this tutorial on a new document and group it (Ctrl +A, right click - Group).
![](https://blogger.googleusercontent.com/img/b/R29vZ2xl/AVvXsEhBp5CwiWsXKExMQ13d4ZUAr1NyTq6f1Fz-M-41V86RXsABD5yC4xNwcT_UkfAOr7XMDUYufoDg9gI6jCwcKrI_KaweExIs9fThSdle_38wYbYjVx8eH5buGEv2VdgXzFctrQty2AxHYD9W/s320/2heart+-+Lock+and+Hide.jpg)
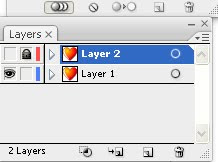
2. Create a new layer and copy paste a heart on it. Lock and hide it for now.

![](https://blogger.googleusercontent.com/img/b/R29vZ2xl/AVvXsEhQQqaPQvX42J_NZ7HR8LbJlQ0hHz-HVBhUIgw7iingdPhdPrq95bglj-G16RO4RKiP-RwfRX8YQcZ9AA6hC5wlFAPWCj3I7-nnCLdJt9NSYC7_rV1w18pbrgPwrliTcp7N09cV71rOUoNX/s320/3+heart+-+Move+group+%2B+Duplicate.jpg)
3. Duplicate a visible heart a few times and place and transform it as shown - you don't have to be precise.
4. Choose this group, make it smaller and place in the upper left corner of your document. Duplicate it (Alt + drag) so it fills our working space.
![](https://blogger.googleusercontent.com/img/b/R29vZ2xl/AVvXsEgIZBYiY-qzxBgIygTqeH03IAU5vEyJJfnpfZEOWXENzWdP1o_zKCvaKCIjbw02vusk-PypFz5FMMGHd_cIAMKk4vGAIw1cQhBZ6w95-dIUme_WekdI3RBrOLe6zIyiX3QlkDfJpPYNmVig/s320/4+Heart+-+Trabsform+Each.jpg)
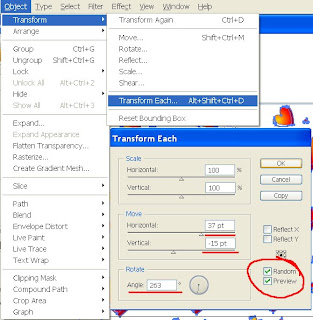
5. Choose all hearts (Ctrl +A) and go to Object – Transform – Transform each.
6. First check Random and Preview so you could see all the changes you're making.
Play with the settings a bit. I suggest you make some manual changes after this step to spread it a little bit more.
7. Add a new layer above this one. Create a rectangle to completely cover the spread hearts. Fill it with bright pink corol(0, 9, 100).
![](https://blogger.googleusercontent.com/img/b/R29vZ2xl/AVvXsEh_hD7eHhGDaFOVS5BCHTOsbSR3I7MlRDW9RWhQ_vm5iHfznxSQ16EuX5v2oyIRuAjIMRh4bRfAAS1fLGhIOP4I4o8EUgq0EWYydRagQ7qnZmlpl7t_TSWGUiLgr8XZfE5NtT8xjCPdx6jH/s320/6+heart+-+Transparecy+-+Screen.jpg)
8. Go to Transparency window and choose Screen.
![](https://blogger.googleusercontent.com/img/b/R29vZ2xl/AVvXsEjM3KYL60LoJsh9xVe_k6dLysWzQk3_S51vnB9g7d_rXVtbfO4WM2nSiW1euL_xhMBpDwcEM8F5-9QARn0KoJHUosLqshjoYu0K_3TxxtHSM6O3CxRjWx-doUk2MMKxDYEDF4pgqLt9ILDP/s320/creating+a+card+-+1+small.jpg)
9. Unlock the Heart layer and place it above the others. Duplicate and place as shown – or as you wish.
10. To write a personal greeting press T on your keyboard and start writing. To change size and font go to Type – Size/Font.
That’s it.
Happy Valentine!!!
If you have any question regarding this tutorial - don't hesitate to post it.
u dont know how much this tut has improved my skills...thanks a lot and plis plis kip more flowing...
ReplyDeleteI am so glad to hear that :)
ReplyDeleteI promise to publish more of those :)