![](https://blogger.googleusercontent.com/img/b/R29vZ2xl/AVvXsEjM3KYL60LoJsh9xVe_k6dLysWzQk3_S51vnB9g7d_rXVtbfO4WM2nSiW1euL_xhMBpDwcEM8F5-9QARn0KoJHUosLqshjoYu0K_3TxxtHSM6O3CxRjWx-doUk2MMKxDYEDF4pgqLt9ILDP/s320/creating+a+card+-+1+small.jpg)
This tutorial will be divided in two parts. In Part 1 we will create the Heart itself. In Part 2 we’ll create the background for our card.
Let’s begin.
![](https://blogger.googleusercontent.com/img/b/R29vZ2xl/AVvXsEjHijidkIPAsQxitn9xPpcgW1wOv4LDnhUBYulTfZ4_dyJiVGwhOwY67RXQTKcnTGX0yzl3sEMLcdGlZIZCFuWA3DzWLBBkSFGxn5nsSoAAnhnOzLwTaIaxurmK_dvUKs0kwxOJE4n9VXnk/s320/2+-+Shift%2BC+image.jpg)
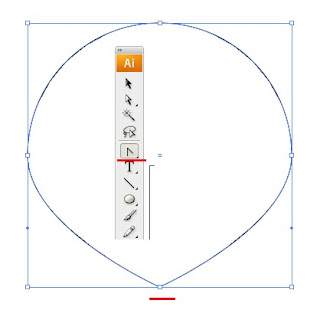
1. Create a big circle (L+Shift). Press Shift + C on your keyboard and choose circle’s bottom anchor point. It will turn from round to pointy.
2. Press A and choose the upper and bottom anchor points and pull them down a bit till it looks like a huge water drop.
![](https://blogger.googleusercontent.com/img/b/R29vZ2xl/AVvXsEgrt6K4xFeBrnDb-m0i8_ZykSil2S3jz-Zq2FAg7JBrWozPy5fmXmf-heJ7kviRlSCu8US2Bpf8uRwRUjq3bUQtlamljszrVraoizqclUDrrmd6AE5I2FkwsEtwUURKde8FCSAXflww-Adg/s320/3+-+2+circles.jpg)
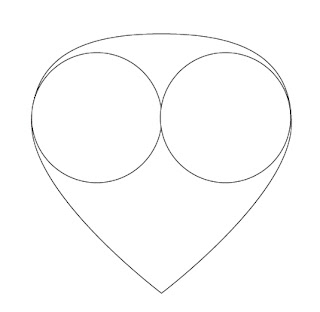
3. On a new layer create another, smaller circle and duplicate it (Alt+ drag). Go to Window + Align and choose Vertical Align Bottom. Place as shown.
![](https://blogger.googleusercontent.com/img/b/R29vZ2xl/AVvXsEgpsX45ugZ91VcM-_DVgLn7L3Qr8nB8zBreumCLTQPPgTBqaKyNhtG7wYvfS00ak_UyfJcsmALZOtkMcdgHWfMpZQQr-_ny6Iu6gMEES4vVw0U7t3gEHL0ODImzjnzQpGeQt-q7-OSqytgy/s320/4+-+heart+shape.jpg)
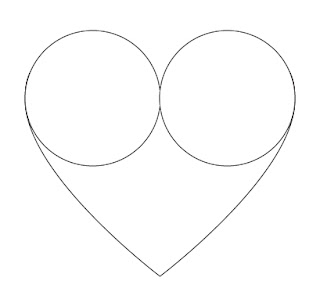
4. If needed, pull the upper point down a bit more to create a shape of a heart.
![](https://blogger.googleusercontent.com/img/b/R29vZ2xl/AVvXsEizLzsMK5CeoQ7YFnj5Wlv_jy38t-tdUezsNObVuWzztzSiWndTh3mkhIy5PhqBfY81sNr1YIbToHGS9ryn8xSKv4I_B3BhD0MahipdLY7or1FqtNA2ed5w8uu403l8t-PI_im7umxDbOto/s320/5+-+heart+shape+-+add+and+expand.jpg)
5. Choose all figures and go to Window - Pathfinder. Press Add and Expand.
![](https://blogger.googleusercontent.com/img/b/R29vZ2xl/AVvXsEi9VqMbXfyuQOeBT9LneEHZnreqSYwC7dRxRyPeomS32D22ztBX0XPBWw_OavP9ru7q5jUVtEEbVFg7UnVAWyRvF-aJN12R1mhniUWQ79Fu6FENvALXfOqOg2U_IBnr0jd5LQph_J8k72GK/s320/6+-+duplicate+twice.jpg)
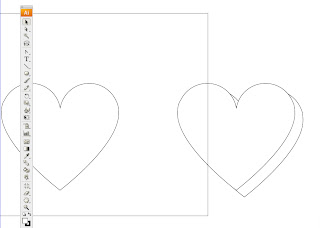
6. Duplicate (Alt+drag) the heart twice and place as shown.
![](https://blogger.googleusercontent.com/img/b/R29vZ2xl/AVvXsEiqU8hfw98NZSFxqj88J2mNxr26t278LtbaxdZEFXElFJ0M_lIrZ-0wc_0Eupc-VxNmCQ8_qwYjk6eczZ5eFZOxJ3jw3tkRC7OaKF6EUvYael7fkuycekMB9nTKJ6KzlXfjBgMugNqav1hV/s320/7+-+Red+highlight.jpg)
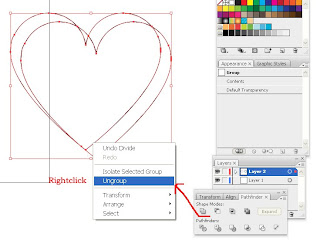
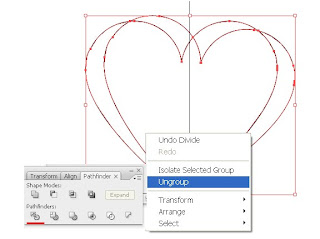
7. Choose both hearts, go to Pathfinder and choose Divide and Ungroup.
![](https://blogger.googleusercontent.com/img/b/R29vZ2xl/AVvXsEikTamw5E_bnz5cXUB-0tp06gcfAqFKesfbQs2ZMzkQY-X6Rlv3eCYAAepl8SJ2YkpVD2UCrnovQ3LMRKa2zDhVioZ4-reMcd_0s31x0xdvUi9qWBuAQhdqdhLsTPPGmAfPj8mqGOYDzT0Z/s320/8-place+red+highlight.jpg)
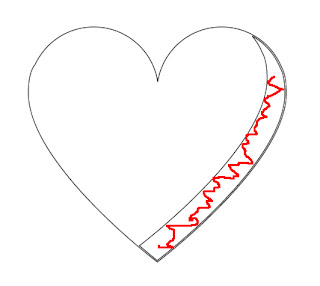
8. Choose the right part of the divided heart and place as shown. Alight to Top and Right. Erase the leftovers.
![](https://blogger.googleusercontent.com/img/b/R29vZ2xl/AVvXsEghbRVGNtG4kdfAynPTK7c4bzSz-4dVhRPyKUcSUG6Z0PBoUax-sn5ALgJBbAw4ipzLSPZkMLxzgPIHJDU2w8kkL1o9rDY2QWBhtoJ_HRqpMCn2Bl1acIxWr9gpOZjseQRCwRZ4wTT-f3sm/s320/9+-+white+highlight.jpg)
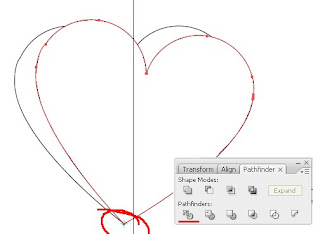
9. Create another copy of the original heart and move it aside. Press R and choose Hearts bottom anchor. You will see a small blue circle appearing above it. Press Alt and rotate to right as shown.
![](https://blogger.googleusercontent.com/img/b/R29vZ2xl/AVvXsEheOYsmmpRSHxewCdRNj5-mqy8HPLg41uEGPT2wYsCCnCNKnSR7T6o0801DGp8HUf3cEG8ik9J7mrqaaPzR4eckPk7hd4ShcfdfKMuu8fBcvU7r4jHnWlTm50OSZboKmI44TIKyHUGoc2Vg/s320/9+-+white+highlight.jpg)
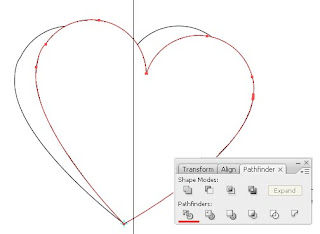
10. Choose both hearts, go to Pathfinder window again and press Divide and Ungroup (rightclick).
![](https://blogger.googleusercontent.com/img/b/R29vZ2xl/AVvXsEj7cZCImw2APdsXkCX_34ia5TIF2EmccFDJgM3jYk6LK6yqYas31EZ8jOp0r4GyExfISzav2l2yytmbflB3sTQEcrZC18R2dC_N1mLgctP3tqLdFdyFYexfjg2uTHcUnI0KlNZQXI1I0tHY/s320/10-white+highlight.jpg)
11. Choose the left part and place as shown.

![](https://blogger.googleusercontent.com/img/b/R29vZ2xl/AVvXsEgAmn8SIlFDiqk3PByrpLjVKZdDl9fSk3e2JaiceEIdu8k3MwShEELdIxEJzWq0Vh3es7IHAwtJNxraRiPnNq8cxXwRcwpecIjhaYWKe62wI-SqvNnP20pylVcZt8CAu492oLYTKsc1AwS6/s320/11+-+heart+outline.jpg)
12. Place it as shown. Make this detail a little smaller by moving corners. This will be the a white highlight
13. Another way to create this highlight is to draw a crescent shape with a Pen tool.
It’s time to color the heart.

![](https://blogger.googleusercontent.com/img/b/R29vZ2xl/AVvXsEj5nRaJh8uH3PvAbMEx93EJt0x8HGavRaVYTSlVOYHtj1W1aLlK6vHpzmH42DPY_h-gSlE5Gq2g14X6ujc6jbqlmxGCpP1_qnpLCV_w4uKN0Ds3xENADiV5-BwOlUAUoaXKYStSmiYg6i50/s320/heart+-+final+image.jpg)
14. Choose Cherry color for the right part and White for the Left. Delete Stroke for both.
15. The heart itself will be colored with Radial gradient colors - Red and Yellow. Apply by pressing from upper the left corner of the heart.
The heart is ready.
In Part 2 of this tutorial we'll be making a background for our Valentine greeting card.
If you have any question regarding this tutorial - don't hesitate to post it.
No comments:
Post a Comment