November 30, 2013

Drawspace lesson J04: How to transfer an image from one sheet to another.

Another method that's supposed to make an artist's life easier is tracing and retracing the image. Lesson J04 suggests another method like that. Basically, you take an image and transfer it to another, cleaner sheet of paper. What you do is you turn the sketch face down and give its outline a thick rub (without pressing too hard). After that you place it back down on a new paper and go over the original outline. This should leave a new outline on a new paper.

To do that I took one of the sketches I made during this program and printed it out. 

Since the printout was good, the outline was visible when I flipped the paper over. Here it is. I did the rubbing using the 2HB pencil. You can even see it's a turtle. 

I did the tracing with a red pencil since I wanted to see exactly where I did or didn't go over the sketch. I did consider the red pen but then decided not to. 

This is the final outcome.
As you can see it is very light and gentle. The original outcome is even lighter then here; I had to Photoshop it so it could be more visible.

Tip of the post: when using this method use only a newly sharpened pencil otherwise your retrace will have a thick line like mine, and that's not a very good outcome.

When I finished reading the lesson I was pretty skeptical about the necessity of this method. My first doubt was weather the rubbing would leave its marks on the paper beside the tracing itself. Second - is there something beside the need to have a neat image? And then it hit me: this method gives you a chance to draw and alter the image over and over again! And what's the good in that? I guess I'll discuss it in a separate post.

November 28, 2013

Drawspace lesson J03: How to draw a symmetrical item

New team member is in town - Drawspace J03 introduces drawing with a Tracing paper!!! And why, you ask? Because this lesson is all about drawing symmetrical objects.
The method suggests using the paper to draw a simple vase, but since I didn't really understand the method and I don't have any tracing paper, I'll have to make it without.

That's the sketch.

It took me 5 minutes to draw - outline only, no shading or anything, so I decided to draw a chess pawn.

This is it.

And that's the sketch.

After finishing the shading part I've realized that I captured the form all wrong. If you notice, the bottom part is at all uneven and it's non-proportionally large regarding its top! I guess I didn't make as many helping lines as needed. So I sketched it again.
Much better, don't you think?

To keep on the practice I did a sketch of this Chess King.
 I worked slowly and very methodically. Plenty of helping lines and loads of erasing. The result is ok.

Tip of the post: Always, at any times look for the basic form inside the item you draw! Always! The mistake in the first Chess Pawn drawing came ONLY! from the fact that I did a round form first and not the square. You could see how better the right sketch look comparing to the left one and to the original on the photograph. (Yes, I know, I took the picture from another perspective, that's another note for me).

Wow, hell of the lesson, hell of the sketching and hell of the post! I'm so glad to move on to the next one!

P.S. When I opened my chess set I was hit by the chess smell, and it made me wonder: how is it possible that after so many years being manufactured, every single set of wooden chess still have this strong smell of wood and varnish? Incredible!

November 26, 2013

Drawspace lesson J02: How to pencil blend properly

So, just like the title says, lesson J02 is about pencil blending. I wrote before about how I feel about blending here, so I won't repeat it. I do understand now, after reading this lesson, that there are many factors to consider. Things like paper and pencil quality or a blending tool and a bare (oily) finger touching the sketch. Also I learned that no blending will improve badly shaded sketch. I guess that was the reason for me hating the shading technique this much: so dirty and no improvement.

So with that in my mind, I decided to make an experiment of my own.

I decided to do two sets of blends - one set made on a simple white printing paper I use on an every day basis and another made on a thicker off-white acid-free 180 mg paper.

These blends were done on a white paper.
Messy shading
Hatched

Crosshatched


And these were done on a heavier off-white paper:
Hatched:

Crosshatched:

I must say that the experience of shading on a heavier paper was very interesting. The shading is smoother and better looking. It makes me wonder....

What do you think?

November 24, 2013

Drawspace lesson J01:

Wow! It's a mile stone!!!

Today not only do I start a new section of the program, I also move one from the Beginners (A-I) level to Intermediate (J-S).

Lesson J01 sums up most of the things were discussed in sections A-I. Artistic tips and tricks that are supposed to help the artist to utilize the process and to become more productive, more efficient and more comfortable in his or hers work.

It is a list of 130 items and I will introduce and summarize here those that I use now myself. Some of these tips became habits in my everyday work and affect it greatly.

# 3. Always put your pencils somewhere so they don't fall. Pencil with a broken graphite is a very difficult to sharpen. - My pencils are placed in a blue wooden box with a cloth inside it. I put the cloth and place my pencils sharpened part down so I easily see the grade of the pencil.

#10. Don't draw on a flat surface, it could distort the proportion and twist the sketch, thus make the sketch less realistic. - I never worked on a flat surface; it was just uncomfortable to me. At this point, as I do my sketches on A4 paper, I find it comfortable to use a simple clipboard. I believe that if and when I will change the format of my work/paper size my working habits will change too.

#14. Don't press too hard on your pencil, it can ruin the sketch and make it very difficult to retouch. - This is something I had to learn how to do. In all, only after beginning the Drawspace program, did I start using pencils of different grade. Last year when drawing flowers I used simple 2HB pencils and always wandered, how come my sketches get to be so messy. Now I know. It's all about the pencil's grade.

For some reason one of my favorite things that I adopted big time is to place a tissue paper under my hand while shading. It is to avoid smudging the sketch and finger -oiling the paper.Or maybe I just missed it while reading.

As I read through the given list I've noticed that some things in it are simply irrelevant at the moment and that is for several reasons. One - I didn't get yet to the level when I could use these tips. Like those in drawing a person - tips 67-83 - or signing my name - tips 98-101. Some of them are a general knowledge and recommendations - 122-130. Or a Perspective drawing - tips 84-91.

Because of these reasons I believe I will get back to this lesson in several months when I'm done with the Intermediate section (part J-S).

And how about you? Have you read the article? Do you have any drawing tips you could share? Please do!

November 22, 2013

Do you use a web timer service?

I recently started using a web timer service; I've heard of it before and tried to use it but without any luck. After that I read some book about time management and decided to give it another go. For now it works wonders for me. It has a 25 minutes periods with short (5 min) and long (10 min) breaks. You have 25 minutes to work on the project. Obviously, you can set alarm again and again but you have to make the maximum of that time. It's all about mindset. I set my mind to the fact that all I have is these 25 minutes and I have no time to waste.

Highly recommended!

November 20, 2013

Drawspace lesson I13: how to draw a cartoon snake

Well, a cartoon snake. A cuddly, even. I am not a big fan of snakes, really, but I'll do this lesson for the sake of the lesson.

LO13 is divided into three sections: basic contour, shading and marker outline. It suggests creating a grid for this particular sketch, but I want to try and manage without.
As I read the lesson before drawing I realized that drawing it without the helping grid could be really challenging since it has so many curves and details. The shading part seems simple enough and the marker outline is a 5 minutes work tops.

So this is it. This is the first part of the sketch.
It took me 20 minutes to draw, and 10 more minutes to outline. As you can see, there are no many helping lines, as promised. I did create a basic rectangle just to keep the proportion right. Also, I drew a full line when making the body's curves, erasing them afterwards.

This is the shaded and the outline finish. 10 more minutes.

I don't think that the marker outline was necessary here, but I did it anyway.
And, as you can see, I managed to keep the right proportion without the square grid. And for that I'm proud.

Have a great day!

November 18, 2013

Taking a break from blogging: a must or a no-no?

Hi all!

Last week was a weird one. For the first time this year I think I managed to make an almost week long gap between my posts. I know I post a lot, and every post is includes several sketches that become more and more complicated, thus it takes longer to draw them. I have no particular reason for this gap, I just feel that my energy is somewhat off. Just a bit. The irritating thing is that I do want to draw! Very much! But whenever I take the pencil in my hands I put it down almost immediately.
Last month I started a 365 drawing project - one or more fast sketches per day, and this month I did no sketches. I joined Conjure for her weekly flashmobs only to realize this is all just too much for me at the moment. My Drawspace lessons are moving greatly, but at this point, as I almost reached the end of the Beginners section, all I want to do is to skip the lessons left to be done and move one to the Intermediate section! And that would be cheating and I don't want to do that.

I do hope that in several days I will be able to get back to normal and continue my training.

Wishing you the best of weeks,
Dalia

November 15, 2013

Drawspace lesson I12: how to draw a sheep

Hi hi,

There's no lesson I11 so jumping on to I12. Jumping on to drawing a Sheep. Cute little sheep called Dolly, Yes, the famous one :)

And, for the first time in long long time - there's a challenge. We're supposed to draw a reversed version of the sheep. This is it.
It was far more difficult task, maybe because I'm a righty, and used to draw from left to right. But I managed and it was fun. And they don't look alike at all!!!

I'll keep on practicing,
Dalia

P.S. Remember Boundin'? A cool cartoon by Pixar of a Dancing sheep and a Rabbit? If you haven't watched it yet, you really should, it's so cool! I love it!
P.S.S. You may also want to check the art of Menashe Kadishman, an Israeli artist. Sheep portraits is his trademark art.

November 13, 2013

Drawspace lesson I10: How to draw Jack Russell terrier

Hi all!

Moving on to Lesson I10. Drawing Jack Russell this time. For some reason I feel that I already did this sketch, I just don't remember when. And I'm not talking about the nose sketch I did here. I'm talking about the face in a whole. But on the other and, who cares, drawing practice is a drawing practice and practicing drawing is what I should do.

So this is my sketch of Jack Russell.

In the middle of it I've decided that it was too messy, so I did a second one.

After finishing the second try and seeing that it is not much better than the first, I decided to go to the original (it was really a photo reference, not a real dog). And I'm so glad I did that!
To me, this one looks so much more real than the other two! I did the sketch with a weird sense of relation to this dog. I have no idea why but while drawing it, I felt that got to know this dog in a way. Weird, isn't it? Maybe that's exactly the reason why it looks better that the first two... I don't know. I think that the nose is now that good but I just love the eyes, although they are too large and human :).

Anyway, have a great day,
Dalia

November 10, 2013

Drawspace lesson I09: how to draw a pig

Hi all!
Let's draw a pig! That's what lesson I09 suggests we do, so, like Marvin from Red said: "I'm bringing the pig!"

The piglet in the lesson was really cute.

It seems that I got the form pretty but my shading, well, was far from perfect. Maybe I should have done the strokes shorter. After all, pigs usually don't have a long hair...

These are the references for my challenges. The "same pose" pig and portrait. Here they are.

The shading went pretty slow. So slow that I couldn't make myself finishing the portrait, so I decided to leave it as is. And you know what? I love that thick 9B outline!

I hope you were more successful than myself in this shading part.

See you soon,
Dalia

Tip of the post: When drawing/shading fur, move your pencil in circle or a wavy line. It will make the fur spread more realistically on the drawing.

November 08, 2013

Tips and tricks: How to make pencil sharpening more efficient?

Hi all!!

Are you familiar with this situation that you have to sharpen your pencils over and over again? I'm sure you are! And then you have to go to your trash can over and over again? What a time waste, isn't it? So what do you do?

Well, the first thing to do is to go and buy several pencils of the same type and sharpen them all at once. But what if it's not enough? What if your sketch requires really thin pencil tip and you have to resharpen every other strike you make? What if you don't use these huge sharpeners but still keep it with the simple small ones? Bummer! So I decided to put an end to it. Since I'm pretty lazy by nature, I used to take a tissue paper and sharpen everything in it and only then through it all away. But recently, I have to sharpen one pencil only pretty frequently. So I use A LOT of tissue paper now. After a while I decided not to waste so much paper but take a simple container to turn in to my sharpening bin. Yes, it's exactly the sharpener and container principle but why should I buy something if I can use things I already have?

So I took this cute container I bought years ago from Ikea
(it's true, it's been sitting in the kitchen closet for like 10 years now, waiting for it's time to shine!!!) and started using it. It's light, easy to open (no screwing required), fits perfectly in my palm and I love its shape. I actually use the same container for my erasers and sharpeners.

Bu you know, any small see through plastic box will fit. I just happened to have these cuties, so why not use them?

I hope you find this idea useful.

Have a great day,
Dalia

November 06, 2013

Drawspace lesson I08: How to draw a a turtle

Hello!

Today is a Turtle day (well, not really)!!! Lesson I08 is a Read and Draw a Turtle lesson! It is also a draw-by-squares lesson but I don't want to do that. Challenging myself, you know.

So this is my "by the lesson" sketch.
In all, I do like the outcome this time. Although I don't feel comfortable with the turtle's paws, but that's how it was on the lesson's reference.

After finishing the sketch, I started looking for the challenge reference image. I must tell you, it was not an easy task since all the turtles are absolutely adorable!

This is a first reference. You can see that the perspective is similar to the lessons' original, but it didn't make the drawing easier.
In fact, it was a hard one. I don't know really know why, because the shape seems to be pretty simple. I guess it wasn't. I intentionally left all the helping lines visible and left it with no shading. I just let it be.

This is another reference. I loved the captured moment, and now, after finishing the sketch and writing these lines it still makes me smile.
The Waving Turtle looks SO unfinished, but I guess at this point that's the best shading I can do. I loved every minute I worked on it - it made me think, consider and reconsider, erase and add, change pencils and trying to figure out where should or shouldn't I use the 8B pencil. The "chicken" me tried to add some more shading but there was no big success.

That's it for now.

Have a great day,
Dalia

P.S. The really nice thing about this lesson is that it gives some general knowledge about turtles. The one appearing in this lesson is called a Box Turtle and it can hide inside its shell.

November 04, 2013

Drawspace lesson I07: How to draw a mouse.

Hi hi.

I'm moving on to the next lesson. It's still about animals, hair and fur and this time we draw a mouse.
I don't know how I feel about mice. They don't disgust me like they did in my childhood. When I see a fleeing mouse or a dead rat I pity it. I know I wouldn't keep one at home, that's for sure. But I wouldn't mind to draw one and that's what I'll be doing now.

The lesson is simple. There are some sketches, some explanation and some more sketches. This is mine.
And, obviously - I don't like it. I don't like the shading, I don't like the fur, I don't like the thick outline and I don't like the small ears.

This is my first challenge.
While drawing I managed to get to like this one. I had a bit of a problem with its paws and a huge problem with its whiskers. But otherwise - I like what I did.
It's almost the same position as the one from the original sketch.

This is my second challenge. It took me a while before I started sketching this one. At first I just sat quietly to study and admire the photograph. Did you notice the pose? And the gorgeous large shining eyes? With these thoughts in my mind I began this challenge.

That's the result.
After scanning and looking at it again I can see now that there are too little dark tones, I should have worked more with my 6B pencil. The nose is also not something, as the eyes, but I do like the general form and the fact that the mouse looks fluffy.

It's a good thing I don't like many things, it means I still have things to learn and perfect.

Have a great day,
Dalia

November 02, 2013

Drawspace lesson I06: How to draw a feather

Hi hi,

Today we draw Feathers. Lesson I06 gives an explanation about the Feather's structure (quill, vane, shaft) and there's a usual show-and-tell of the how to draw it. So without too much talking let's begin.

This is the feather I did.

I don't really like it; it looks too much like a leaf. It is too round and clean. No fluffiness at all. I know there are straight and neat feathers, but one is over straight and over neat. Although, I'm sure that in the future this experience will help me to draw a better looking leaf, so it's all good.

In the meantime I found this to be my reference image for a Feather challenge.

And then I did this one.

These two definitely look better than the first one. I like Feather 2 a lot, it looks very realistic to me. Feather 3 suggested another difficulty I had to deal with for the very first time. The fact that a light object is placed on a dark background requires a different way of thinking and sketching. Although in general I'm pretty happy with the outcome.

I hope you found this lesson useful.

Have a great day,
Dalia

365 drawings - 1 drawing per day: October 2013

Hi all.

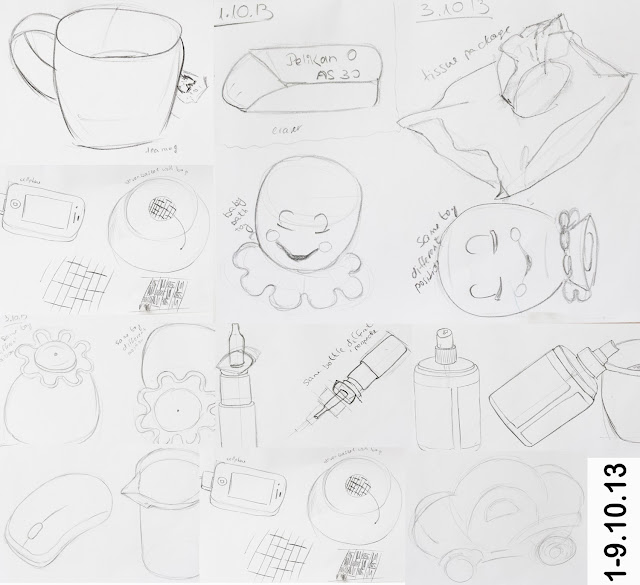
This is my report on 365 drawings: 1 drawing per day project. It seems to me that at this point I just can't do only one sketch - I do several every day. The idea is to draw everything, anything, whatever I see in front of me. Coffee mugs, baby toys, computer screen, rough and quick, anything goes.

This is the outcome. 24 A5 pages filled with sketches.

It was not an easy task. At times I missed days and compensated with several sketches in one day. Somehow at mid-month I filled 15 A5 pages. 15 small pages for 15 days. Sometimes the process was lazy and difficult; at times it was cool, fun and easy. Since the paper is so thing I used only one side of it. Some of the objects were interesting and cute enough for me to do several perspectives of it.
At some point I was brave enough to start sketching more complicated objects (they are for me) like scissors, hair brushes and irons. And by the end of the month I ended up with two thick booklets filled with sketches. And that was the whole point!

I invite you to join this experiment and share your thoughts here. It is to become a monthly thing, so do join me!

Have a great day,
Dalia

P.S. It took me more than an hour to scan and arrange it all. Boring and frustrating work. After looking at the result I decided to re-scan it all since the scan was horrible. After another scanning attempt I decided to photograph it all. It took me a long time but the result was much, much better. For the next time I intend to learn how to better control my camera too.